- git status - pretty much self-explanatory, but basically shows you the current branch and whether it is up-to-date with the remote branch, as well as and untracked files or uncommitted changes.
- git add -A - adds files to the git index, -A is the option for "all files".
- git commit -m "commit message" - Commits the current changes with the commit message provided (-m is the message option).
mandag den 6. juni 2022
Adding a project to GitHub
onsdag den 1. juni 2022
Exploring the capabilities of .NET MAUI part 2: Saving and loading language selection in app preferences, skipping selection page if language was loaded from settings
In my last post I briefly touched on how you can implement localization resources in a .NET MAUI app.
By default, .NET will try to find localization resource that corresponds to that of the system that the app is running on, which is pretty convenient.
For this post, however, I wanted to implement a list of languages so that the user can select a language from a language selection page at first app launch, after which the selected language will be saved to app preferences, which is built directly into MAUI for all platforms that it supports.
So, I will implement a ContentPage which its own ViewModel (which is constructor-injected into the ContentPage using .NETs built-in depdendency-injection), which will serve as the first page that is shown only if the preferences contains no saved language.
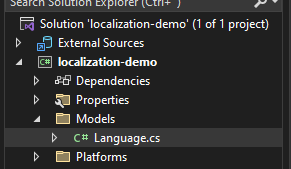
First things first, I started with creating a simple Language model, which I placed in a "Models" folder in the solution:
namespace localization_demo.Models;

public class Language
{
    public Language(string identifier, string name)
    {
        Identifier = identifier;
        Name = name;
    }

    public string Identifier { get; set; }
    public string Name { get; set; }

    public override string ToString()
    {
        return Name;
    }
}
After this I began writing the code of the ViewModel, but explaining every line of it in text would make this post a bit longer than I would like, so I've instead placed some comments explaining the basic idea:namespace localization_demo.ViewModels;
public class ChooseLanguageViewModel
{
public ChooseLanguageViewModel()
{
// instantiate ObservableCollection of Language objects
Languages = new ObservableCollection<Language>
{
new Language("en-US", "English"),
new Language("da-DK", "Danish"),
};
// try to load saved language
LoadSavedLanguagePreferences();
}
// this property will serve as the collection which we will show in our contentpage
public ObservableCollection<Language> Languages { get; private set; }
// contains the current selection
private Language _selectedLanguage;
public Language SelectedLanguage
{
get => _selectedLanguage;
set
{
_selectedLanguage = value;
SetLanguage();
}
}
private void SetLanguage()
{
SaveLanguagePreferences(SelectedLanguage);
// change locale:
Thread.CurrentThread.CurrentCulture = new System.Globalization.CultureInfo(SelectedLanguage.Identifier);
Thread.CurrentThread.CurrentUICulture = new System.Globalization.CultureInfo(SelectedLanguage.Identifier);
CultureInfo.CurrentCulture = new System.Globalization.CultureInfo(SelectedLanguage.Identifier);
CultureInfo.CurrentUICulture = new System.Globalization.CultureInfo(SelectedLanguage.Identifier);
// continue
GoToMainPage();
}
private void LoadSavedLanguagePreferences()
{
if (!Preferences.ContainsKey("locale"))
{
return;
}
var savedLocale = Preferences.Get("locale", "");
if (string.IsNullOrEmpty(savedLocale))
{
return;
}
var correspondingLanguage = Languages.Where(x => string.Compare(x.Identifier, savedLocale) == 0);
if (correspondingLanguage.Count() != 1)
{
// something went wrong here
return;
}
SelectedLanguage = correspondingLanguage.First();
}
private void SaveLanguagePreferences(Language language)
{
if (language == null)
{
return;
}
// check if preferences is already set
if (string.Compare(Preferences.Get("locale", ""), language.Identifier) == 0)
{
return;
}
Preferences.Set("locale", language.Identifier);
}
// //// does not preserve backstack
private async void GoToMainPage() => await Shell.Current.GoToAsync($"////{nameof(MainPage)}");
}
And then I implemented the ContentPage like so, notice that it sets BindingContext in the constructor to the injected ViewModel in order to bind to objects in xml etc:
<?xml version="1.0" encoding="utf-8" ?>
<ContentPage xmlns="http://schemas.microsoft.com/dotnet/2021/maui"
             xmlns:x="http://schemas.microsoft.com/winfx/2009/xaml"
             xmlns:vm="clr-namespace:localization_demo.ViewModels"
             xmlns:model="clr-namespace:localization_demo.Models"
             x:DataType="vm:ChooseLanguageViewModel"
             x:Class="localization_demo.ChooseLanguagePage"
             xmlns:res="clr-namespace:localization_demo.Resources.Strings">
    <VerticalStackLayout Spacing="25" Padding="30" HorizontalOptions="Center">
        <Label Text="{x:Static res:AppResource.Choose_language}"
               SemanticProperties.HeadingLevel="Level1"
               FontSize="32"
               HorizontalOptions="Center" />
        <CollectionView ItemsSource="{Binding Languages}"
                        SelectionMode="Single"
                        SelectedItem="{Binding SelectedLanguage}" >
            <CollectionView.ItemTemplate>
                <DataTemplate x:DataType="model:Language">
                    <Grid Padding="10">
                        <Grid.RowDefinitions>
                            <RowDefinition Height="Auto" />
                        </Grid.RowDefinitions>
                        <Grid.ColumnDefinitions>
                            <ColumnDefinition Width="Auto" />
                        </Grid.ColumnDefinitions>
                        <Label Grid.Column="1"
                               Text="{Binding Name}"
                               FontSize="24" />
                    </Grid>
                </DataTemplate>
            </CollectionView.ItemTemplate>
        </CollectionView>
    </VerticalStackLayout>
</ContentPage>
using localization_demo.ViewModels;

namespace localization_demo;

public partial class ChooseLanguagePage : ContentPage
{
	private readonly ChooseLanguageViewModel _viewModel;

	public ChooseLanguagePage(ChooseLanguageViewModel viewModel)
	{
		InitializeComponent();
		BindingContext = _viewModel = viewModel;
	}
}
However, in order to use dependency-injection in this way, we need to register the types in the dependency-injection system in the CreateMauiApp method, so it ends up looking like this:
public static class MauiProgram
{
	public static MauiApp CreateMauiApp()
	{
		var builder = MauiApp.CreateBuilder();
		builder
			.UseMauiApp<App>()
			.ConfigureFonts(fonts =>
			{
				fonts.AddFont("OpenSans-Regular.ttf", "OpenSansRegular");
				fonts.AddFont("OpenSans-Semibold.ttf", "OpenSansSemibold");
			});

		builder.Services.AddSingleton<ChooseLanguageViewModel>();
		builder.Services.AddTransient<ChooseLanguagePage>();

		return builder.Build();
	}
}
And then lastly, we need to add the new ChooseLanguagePage to our AppShell as a ShellItem, where we also specify the route to it, like so:
<?xml version="1.0" encoding="UTF-8" ?>
<Shell
    x:Class="localization_demo.AppShell"
    xmlns="http://schemas.microsoft.com/dotnet/2021/maui"
    xmlns:x="http://schemas.microsoft.com/winfx/2009/xaml"
    xmlns:local="clr-namespace:localization_demo"
    xmlns:res="clr-namespace:localization_demo.Resources.Strings"
    Shell.FlyoutBehavior="Disabled">

    <ShellContent
        ContentTemplate="{DataTemplate local:ChooseLanguagePage}"
        Route="ChooseLanguagePage" />
    <ShellContent
        ContentTemplate="{DataTemplate local:MainPage}"
        Route="MainPage" />
</Shell>
Now this in by no means a pretty GUI or anything, but the results should be sufficient in terms of being a PoC:
After selecting "Danish", we are redirected to the MainPage of the template app, with out localized strings:
fredag den 20. maj 2022
Exploring the capabilities of .NET MAUI part 1: Localization in .NET MAUI
Note: As of writing this, you have to install the Visual Studio Preview in order to develop .NET MAUI apps.
After creating a new project from a template, I like to build and run it as is, just to ensure that everything is working ok. The default MAUI template app is just a basic hello world with a button that increases a counter and updates the "Current count..." label text to reflect the counter, it looks like this:
We need to add a few resource files that contain the localized strings, and I chose to create a new folder in the Resources directory of my project, called Strings, so as to contain the localization strings (is handy if you support a lot of languages) to which I add one Resources File per language I want to support.
I want to support English and Danish in my app, so after adding adding AppResource.resx for the default English localization, and AppResource.da.resx for the Danish localization, we should have something similar to this:
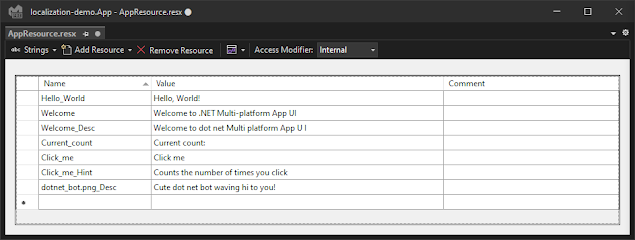
Let's start with making the default language resource file - Visual Studio provides us with an easy way to insert strings to this resource file, so now we just want to move all the strings from the default MAUI template app into our default AppResource.resx file, like so:
After moving all the strings, we can now access the strings by referencing the resource file's namespace in xaml and access the strings directly, like so:
<?xml version="1.0" encoding="utf-8" ?>
<ContentPage xmlns="http://schemas.microsoft.com/dotnet/2021/maui"
             xmlns:x="http://schemas.microsoft.com/winfx/2009/xaml"
             x:Class="localization_demo.MainPage"
             xmlns:res="clr-namespace:localization_demo.Resources.Strings"> <!-- here we declare the namespace that contains the strings -->

    <ScrollView>
        <VerticalStackLayout Spacing="25" Padding="30">

            <Label
                Text="{x:Static res:AppResource.Hello_World}"
                SemanticProperties.HeadingLevel="Level1"
                FontSize="32"
                HorizontalOptions="Center" />

            <Label
                Text="{x:Static res:AppResource.Welcome}"
                SemanticProperties.HeadingLevel="Level1"
                SemanticProperties.Description="{x:Static res:AppResource.Welcome_Desc}"
                FontSize="18"
                HorizontalOptions="Center" />

            <Label
                Text=""
                FontSize="18"
                FontAttributes="Bold"
                x:Name="CounterLabel"
                HorizontalOptions="Center" />

            <Button
                Text="{x:Static res:AppResource.Click_me}"
                FontAttributes="Bold"
                SemanticProperties.Hint="{x:Static res:AppResource.Click_me_Hint}"
                Clicked="OnCounterClicked"
                HorizontalOptions="Center" />

            <Image
                Source="dotnet_bot.png"
                SemanticProperties.Description="{x:Static res:AppResource.dotnet_bot_png_Desc}"
                WidthRequest="250"
                HeightRequest="310"
                HorizontalOptions="Center" />

        </VerticalStackLayout>
    </ScrollView>
</ContentPage>
The CounterLabel text is empty in the xaml because I set it programmatically in the MainPage constructor:
using localization_demo.Resources.Strings;
namespace localization_demo;

public partial class MainPage : ContentPage
{
	int count = 0;

	public MainPage()
	{
		InitializeComponent();
		UpdateCounterLabelText(); // set CounterLabel text
	}

	private void UpdateCounterLabelText()
    {
		CounterLabel.Text = $"{AppResource.Current_count} {count}";
	}

	private void OnCounterClicked(object sender, EventArgs e)
	{
		count++;
		UpdateCounterLabelText();

		SemanticScreenReader.Announce(CounterLabel.Text);
	}
}
We can add the same strings to the AppResource.da.resx file and translate them like so:
Which enables us to switch the resource using the Thread.CurrentThread.CurrentCulture and Thread.CurrentThread.CurrentUICulture APIs provided by .NET. For illustrative purposes, I modified the AppShell constructor to change locale to Danish:
public AppShell()
{
    // change locale to da-DK:
    Thread.CurrentThread.CurrentCulture = new System.Globalization.CultureInfo("da-DK");
    Thread.CurrentThread.CurrentUICulture = new System.Globalization.CultureInfo("da-DK");
    InitializeComponent();
}


